

In this blog I attempt to offer a little glimpse into the technical process involved in creating my photographs. It is a process that continues to develop gradually and organically, and primarily independently of any formal tutoring from anyone. The subject for this blog is inspired by Jearvi, a very talented female photographer with unlimited creativity and a wild imagination, and it dedicates itself to supporting the larger virtual community of photographers I have had the pleasure of meeting online, of which Jearvi is a part.
Perhaps I’ll begin by stating that I have never received any formal training in photography. I am self-taught, mainly through trial and error. I jumped into photography about two years ago, after my closest friend gave me a camera for my birthday. I had always wanted a good camera and was thrilled! I read through the manual and instantly put it to work, experimenting with the camera settings and familiarizing myself with it’s capacities. I reserved hours every week in which to give my undivided attention to my photography.
I seemed to be instantly moved to use my camera as an instrument for my voice. This naturally led to my creating self-portraits. The discovery of the ten second timer on my camera was enough to get me hooked! At first I lacked a tri-pod, so I used stools, counters, and chairs as stands for my camera. When shooting outdoors I usually carried a wooden stool with me, or balanced my camera on fences, or tree limbs! Finally I acquired a tri-pod.
I use a MacBook Pro computer, so when my photographs were uploaded from my camera they went directly into my computer’s photo software: i-photo. There I discovered I could adjust the colors on my images, and play with crops. About a year later, I became excited about what I was creating and wished to share it. I decided I would open a flickr account, though I was not very familiar with what exactly that was! The feedback I received from other flickr memebers proved to be most valuable, as I had unwittingly tapped into a whole network of professional and amateur photographers, eager to support one another. I began to feel as if I were a part of a photography-club of sorts, in which the members all offered one another encouragement, constructive criticism, lessons, challenges and, on rare occasions, even friendship.
Through my exposure to the other photographers on flickr I learned about photoshop and had it installed on my Mac. The potential of what could be created in this “digital darkroom” excited me tremendously! I taught myself to use other artists textures and then began experimenting with creating my own. Paintbrushes and textures opened up a whole new wold to me, as did the techniques required to create a composite image.
On Jearvi’s request, the following is a tutorial on how I create such images. I have chosen my latest image titled “In the Clover”. (There may be more effective, efficient means in which to do achieve this, but this is what I arrived at through my own uneducated efforts.)
First I began by taking this picture of clover growing on my front lawn. The sun was beginning to set behind them and I lay tummy down on the grass and used my zoom lens.

The next morning I took this picture of myself with my tri-pod and ten second timer. The sun was rising behind me.

In Adobe Photoshop CS3 Extended I opened the image of the clover as my first layer, or my “background image” and gave it a little color boost. Then I opened the image of my self, and using the “quick-selection” tool I drew an outline around my body. Then I refined the edge, and copied and pasted it onto the background image of the clover and adjusted it's size. I also had to cut and paste some extra clover flowers around and in front of the edge of my dress, to create the illusion that I was standing amidst the little flowers.

I then took three butterfly images and cut and pasted them into the picture in the same way, duplicating them as well, to make a total count of six butterflies. Lastly, I adjusted their size and moved them to the places I wanted them in.
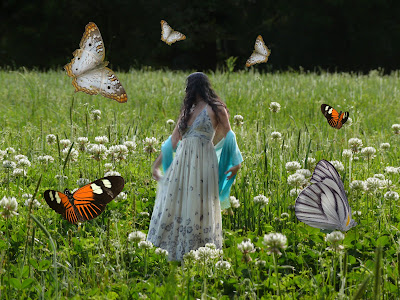
Next, I gave my image an antiquated look by adjusting the color temperatures and tints, favoring yellow.
Finally, I selected my photoshop brush tool and set the tip to 300% size with an opacity of 38%, color black and played around with darkening the shadows and giving the edges somewhat of a vignette look. I did this until I felt I had achieved the look I wanted. The finished creation consisted of a total of ten layers:

I made this particular image on a day I was not feeling well and lay in bed a bit frustrated that I could not go outside. I had that passionate urge to create, so I plopped my computer on my lap and looked for photographs I had already shot the week before, hoping to somehow piece them together into some kind of art. The end result was the image you see above.
I am very new to this, so there may be easier ways in which to do this, but I share with you what I have taught myself thus far, in the hopes that it will inform your own creations in a helpful way. You can see the evolution of my art, if you wish by visiting my flickr photostream. Lastly, I thank Jearvi for suggesting this blog to me and I refer you all to her beautiful photostream for an endless flow of imaginative creations of this type, involving composite images, and lots of original and inspiring ideas! Click here: Jearvi and enjoy!
Thanks for sharing some of your techniques! I thought you had actually taken a picture of yourself in the clover field.
ReplyDeleteBut how could I take a picture of myself in the clover field, Jearvi, when the clover flowers are only as tall as my pinky finger? :)
ReplyDeleteI know! but I didn't recognize the plant, I thought it was just a title.
ReplyDeleteFirst, I just love the final outcome...so magical! And second, that was just so helpful and inspiring! Thanks so much beautiful girl! xoxo
ReplyDelete